Do-it-yourself tree house schemes. Tree house with your own hands. How to make a children's house. Choosing a building site
The tree house is a great place for your child to play, he will be just happy if it is a surprise or he himself will take part in its construction. This will be the envy of all his friends.


Using plumbing bolts 10x160 DIN 571 and the corresponding washers, we fix two logs (boards 20 mm) parallel to each other. Try to drill pilot holes for the bolts as straight as possible. The upper end of the log will serve as a support for the next two logs, directed perpendicular to the previous ones. Then we fix the boards around the perimeter, which form a frame for the floor in your tree house.
Step 2: Level the platform


Moving from one corner to another, we fix a temporary support on each corner of the platform. Next, using the level and pads for the supports, we level the platform. The longer your level is, the better.
Stage 3: Installation of inclined supports

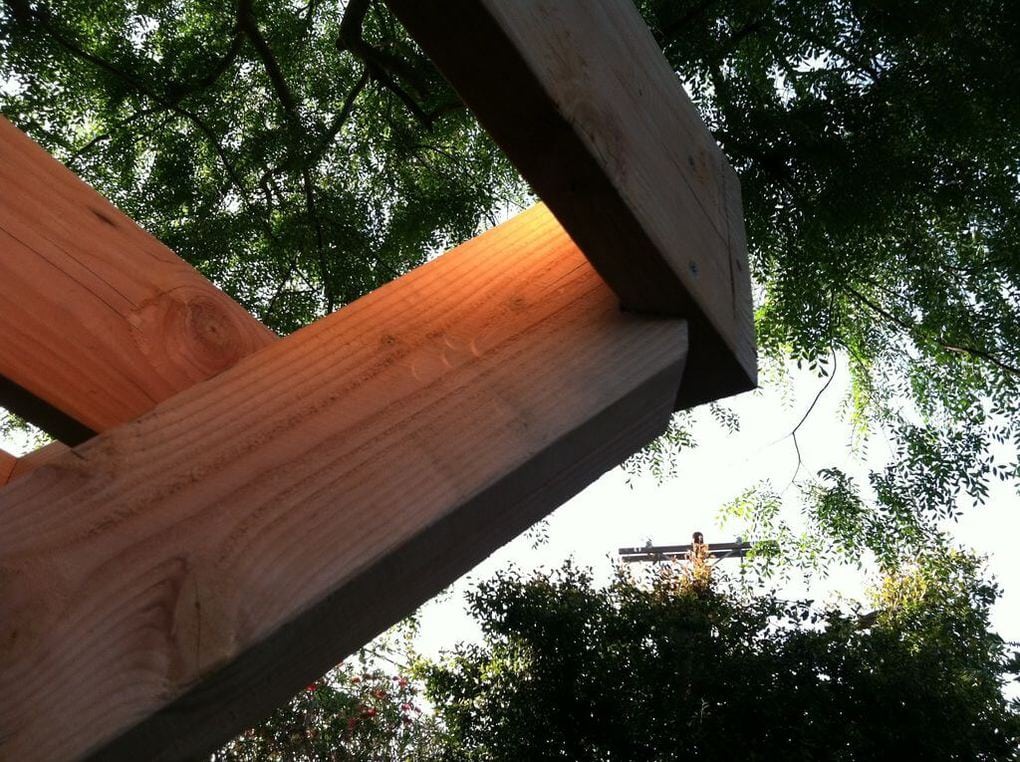


After we have leveled the platform, we can proceed with the installation of inclined supports. Which will support the tree house. For this, supports for beams were used as in the photo. To do this, I had to cut the beams at an angle of 45 degrees. If you do not find such brackets, then these may fit

Please note that the beam is two twisted boards.
Stage 4: Laying the floor


Perhaps this is the best part of the project, because in the final you will have the opportunity to stand on the platform. Flooring can be started from one side. The boards do not have to be cut to the desired length immediately, let their ends stick out, they can be trimmed after. You will need a jigsaw in order to make a cutout for the tree in place. Leave enough room for the tree to grow and sway in the wind. Also at this stage, we cut out an opening for the future entrance to the tree house.
Stage 5: Frames and wall installation


On the ground we collect frames for the walls. We use the measurements that need to be taken after assembling the platform and flooring. When the frames are assembled and while they are on the ground, you need to put them together and make sure that they fit well with each other and correspond to the measurements of the platform. After that, you can start sewing up the walls.
It is better to raise walls with a rope and a block fixed higher on a tree. The walls will be quite heavy. You will have to find yourself an assistant to tie or hold them after you get the walls up.
Stage 6: Roof frame


Before you start making a roof, you need to decide on the slope of its slopes. I used a 1:3 ratio for the skat and it was a good choice as such an inclination made it possible to stand on the roof without the risk of falling off it. Once you have decided on the height of the central racks, you can install them and mount the skate. Once the frame is assembled, you can proceed to sheathing it with plywood. Remember to leave space around the tree, as we did for the floor. I had to cut a sheet of plywood to secure it in place where the tree is growing. Next, we cover the roof with an awning.
Stage 7: Login


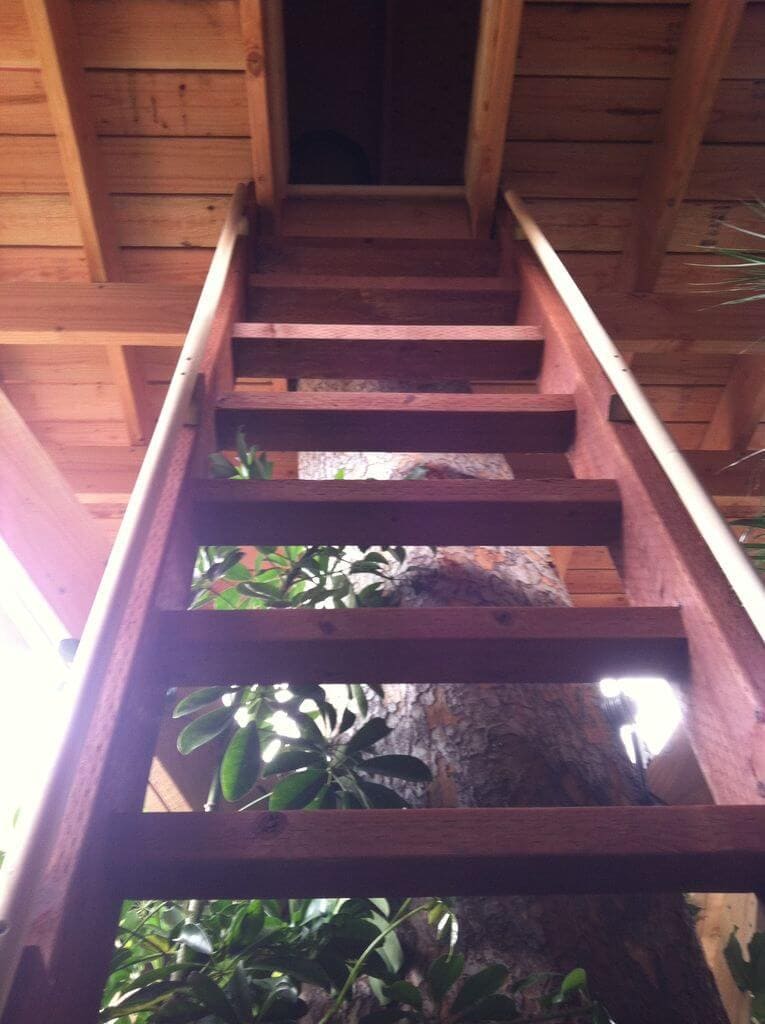
I made the door like a wild west saloon. The stairs were carefully treated with an antiseptic, because. it is in contact with the soil. I made the steps more often so that the stairs were more convenient for small legs.
Stage 8: Finishing work


We mark and make railings so that you can safely go to the balcony.
Everything is not set out in too much detail, since in each situation and with a different budget, everything can be completely different, and if you tell in more detail, you get a very large article. I hope it is shown clearly enough how to build a tree house with your own hands.
Many parents ask how to build a tree house for children, what kind of tree should be for building, materials and tools, what will be needed for work.
A tree house for children should first of all be safe. This means that its height above the ground should not exceed a certain value, and the thickness of the trunk should not be less than 30 cm in diameter.
The process of building a simple tree house
It must have a railing. And besides this, when making a tree house, you need to take into account many more different factors:

Choosing a tree to build
If you decide to make a treehouse with your own hands, then first you need to find a suitable place to build it. There are a number of criteria to consider when choosing. These include:
- the composition of the soil around the tree;
- type (species) of wood;
- his age;
- state of branches and trunk;
- crown volume.
Now let's take a closer look at each of the selection parameters. The base for the construction should be on normal, not sandy soil. Otherwise, the trunk will fall under the additional weight that the tree house will create.
 An example of a tree with a built children's house
 The type of wood greatly influences the choice. Pine, like other conifers, is best excluded immediately. Sharp needles can injure a child, and a resinous trunk will create a lot of problems with washing clothes and washing children. Linden has too soft wood, while poplar, willow and chestnut have weak root systems. Therefore, a do-it-yourself tree house is most often erected on oak or maple. They have not only solid wood, but also a branched crown, convenient for installing a platform.
From fruit trees, in order to establish a small house, an apple tree is suitable. But it is only suitable for babies, its branches may not withstand adults.
The tree chosen for construction should not be young and old. And the more branches there are, the better the result will be. Note that the thickness of the branches on which the treehouse for kids will be mounted should not be less than 20 cm.
Read also
Slides for giving
 Scheme with dimensions and layout of a children's treehouse
 If there are dry branches near the building, they must be removed. If children happen to lean on them while playing, they may fall when the dry wood breaks under their weight. The volume of the crown is also important. The larger it is, the more points there will be for fixing structural elements.
Project drawing
Before starting work and before the materials needed to build a tree house are purchased, it is necessary. It takes into account all the elements, draws up the dimensions and calibrates the proportions.
Children must be involved in the work on the project. After all, they are future tenants, and their opinion must be taken into account. As a result, the home master will be able to create a magical place for games and entertainment. The first step is to make a sketch. To do this, the future house is drawn on plain paper, without dimensions and proportions.
 tree house drawing
 Having agreed on the design, they begin to make real drawings. In them, the structure is drawn to scale, indicating all the data and exact numbers.
The scheme must be made in at least three projections - front view, bottom view and side view. It will be good if the master draws a separate drawing for each side. It is better to draw on graph paper, it has ready-made guides. To work on the project you will need:
- drawing pencil;
- ruler;
- square;
- washing gum.
It is better if there are two types of pencils, with hard and soft rods. The sketch is made first, and the contour is already drawn second. The scheme will help not only in work, but also in the preparation of materials. The master will be able to calculate their number so as not to spend extra money.
Choosing tools and materials
Traditionally, a children's tree house is made from dried and pre-prepared wood. The frame is made of timber with a cross section of at least 5 cm, boards are used for the floor, and the walls can be sheathed with plywood sheets or the same boards. For the roof, plywood is used, on top of which a soft roof is laid, imitating tiles, as in a real fairy-tale house.
Pine board is used as the main material. It is affordable and easy to process. And with high-quality processing and drying, this type of wood can serve small owners for more than one year.
Metal corners and brackets are used as fasteners, and all elements are fixed with self-tapping screws and bolts with nuts and washers. A do-it-yourself tree house requires a certain set of tools. The master will need:
 Tree house design option
 - hacksaw or jigsaw;
- a hammer;
- drill;
- screwdriver;
- pliers.
In the work, the master will also need measuring tools, such as:
- level;
- plumb;
- roulette;
- drawing pencil;
- square.
It is rare for anyone in childhood to bypass the dream of having their own cozy tree house. True, not all crumbs it comes true. Meanwhile, even in adulthood, you can realize your childhood dreams by building a secluded place in the crown of your favorite oak tree and relaxing on a height with the whole family. And if you have already become parents, can you imagine how a wonderful tree house will please your crumbs, allowing you to hide from the whole world and watch nature from a height?!
If you decide to build a treehouse with your own hands in adulthood, then such a structure can turn into an architectural masterpiece. In childhood, even a box seems like a home, while adults want to do everything thoroughly, reliably and beautifully - so that the soul rests and the eyes rejoice.
A tree house for the whole family. Do you want this
If you're planning on building a treehouse for the kids and aren't going to use it yourself, then it's relatively simple. A tiny structure is also suitable, the main thing is bright colors, entertainment devices and, of course, increased security. Here, for example, in the photo below, all this is present. Your little ones will be crazy about this gift.

Colorful house with a slide for children. Like from a fairy tale, right?
Meanwhile, the modern construction of such recreation areas at a height has reached a high level, so you can treat yourself to such a "teremk" without having children. Now the construction of tree houses for a variety of needs is actively developing. In the crowns of trees you can see restaurants, tea rooms, hotels and even residential apartments - with communications and furniture. The largest such miracle house on the planet is located in Scotland, its area reaches 557 square meters. The restaurant hall can accommodate 120 guests. The owner of the establishment had to pay $ 7 million for the implementation of the project, but there is no end to visitors.

The largest tree house is located near Edinburgh
The Swedish authorities have distinguished themselves by their generosity, decorating a public park with an unusual house of about 12 square meters. Every visitor to the park can enjoy the rest in this wonderful tower. There are a couple of balconies, a terrace with a hammock, a wonderful library, a kitchen and even a toilet room.

Meet the famous house in Vasteras Park
The Swedes apparently liked spending time at the height, so one of the local entrepreneurs built a whole hotel with 5 rooms. The structure is made of aluminum plates. The hotel is connected to electricity, the rooms are heated, have bathrooms and kitchenettes where you can make coffee and have breakfast.

If you want to stay in such an outlandish hotel, reserve rooms in advance, as thousands of travelers from all over the world wish to visit here.
In Japan, on the territory of the museum, in the midst of a sakura garden, an eminent architect built an unusual tea house, where every visitor can enter and take part in a tea ceremony at a height.

In Japan, you can enjoy real tea right among the cherry blossoms.
However, such masterpieces are the lot of entrepreneurs and the rich. However, your treehouse plan can be just as interesting, if not as famous. The main thing is fantasy, desire, time and a competent approach. Some families make ships or flying saucers in their garden, others like huts, others build castles. Choose "your" project and go ahead - towards the dream in the sky!

The house can take on the mission of a whole gaming complex. In this case, the parents decided to make some stairs, a terrace and a swing
Which tree is suitable for construction
Before looking for how to build a treehouse, you need to decide on the place and platform for such a structure, because it is important that the tower is not only beautiful, but also reliable and durable. If you choose the wrong tree, you risk wasting money and time. How to do everything correctly?
First, inspect all the trees in your area.
Secondly, choose the best breed for the implementation of such an idea. For example, pine is not the best platform for building a recreation area at a height, since it has prickly branches and annoying “inhabitants” - ants. In general, most conifers are not stable enough to give the house strength will have to use several trees. Linden is not suitable due to the viscosity of the wood; it will be problematic to securely fix anything on such a trunk. Poplar, willow and chestnut have weak roots, so it is dangerous to build a tower on them, because the structure can collapse along with the tree. Where to stop? Experts recommend choosing oak, maple, fir or arborvitae, which are stable, stately and durable. However, an apple tree is quite suitable for a tiny children's tower, but it is better for adults not to climb there.
Thirdly, finding a suitable breed is half the battle, you also need to competently approach the process of choosing the tree itself and the place where it grows. What requirements must be taken into account?
- The site should not be sandy.
- Do not start construction on too old or, on the contrary, young trees that may not support the weight of the structure.
- Give preference to branched trunks with horizontally growing branches, then you will have many points of support.
- The branches intended for fastening the structure must be more than 20 centimeters in diameter.
- Check the trunk and branches for cracks, sharp narrowing, and signs of rot.
- Inspect the crown and cut off weak and dried branches, because later they will still break under gusts of wind, which can damage the components of the house.

Your photo tip for choosing a tree
Basic rules for building at height
So, you have decided that your garden will decorate a tree house, how to build such a wonderful tower correctly? Are there any secrets? As in every business, this process has its own peculiarities. The most important thing is not to harm the tree, because it is the “foundation” of your structure. What rules to follow to maintain the "health" of the plant?
- the bark can only be cut to half the depth, otherwise you will destroy the tree;
- if the trunk is bent, then the structure must repeat this bend;
- try to carry out the main work on the ground, saving the plant from excessive load;
- keep in mind that the tree can still grow and change its shape.
If the teremok is intended for crumbs, make sure that all the components of the structure are fenced - with walls or handrails. For the safety of the movement of babies, a reliable ladder is needed. Focus on age, sometimes a rope ladder is not the best solution. If you want to avoid trouble, add wooden steps. Again, for kids, it is better to build play structures at a low height, using natural materials, and instead of nails, bolts and nuts that need to be sunk into the trunk / branches.

Start with a drawing showing the dimensions of the building, then you can calculate the required amount of materials
Necessary tools and materials for work
To build a "paradise" at a height, you need to have the desire, time, skillful hands, the necessary set of tools and materials.
Take an "inventory" in your garage or shed and prepare the following tools:
- building level,
- saw,
- plane,
- a hammer,
- roulette,
- drill,
- screwdriver,
- milling cutter,
- square,
- emery,
- wrench,
- ladder.
You will also need overalls and gloves.
It's important to know! Pre-saturate all wooden elements with a special compound that protects the wood from decay.

The farm did not find the necessary tools? Do not rush to spend money, try to borrow it from neighbors or friends
Take, for example, a list of necessary materials for a medium-sized house:
- 2 boards of 4 meters (5 by 25 cm);
- 6 boards 3 meters long (5 by 15 cm);
- 3 beams 4 meters long (5 by 15 cm);
- other boards, plywood for railings, stairs, walls;
- cable with a diameter of 0.6 cm;
- 8 metal perforated plates to fasten the bars;
- stainless steel/galvanized self-tapping screws;
- nails, bolts, hooks and other parts for fastening;
- tarpaulin;
- other parts according to your design and drawing.
Video guide to building a treehouse
The standard height is 3 meters, of course, if small crumbs use the tower, then it can be mounted lower. So, how to make a treehouse using the above components?

An example of a mounted frame for a house
Take a beam, loosely nail it to a branch located at a distance below 30 centimeters from the floor of the future tower. Using the level, fix the opposite end of the rail on the other branch strictly horizontally. Repeat the operation on the other side of the trunk. Make sure the bars are at the same level. Carefully remove the rails, measure the distance between the places where the nails were. Then subtract this indicator from 4 m, divide the resulting number by two - this is the size of the segment that you need to measure from the edge of the boards (5 by 25 cm). In these places, holes with a diameter of 1.5 cm should be drilled. You also need to make one more such hole on each side, stepping back from the first segment, equal to the distance between the holes on the branches. Between the holes with a jigsaw or saw, you need to make slots into which you must install spacers to fix the boards, and at the required distance from the trunk / branches. Materials are not recommended to be screwed against a tree as it may continue to grow.
When the base is ready, you can move on to the floor. To do this, you need to cut the boards. 2 boards (5 by 15 cm) should be equal to the length of the flooring, the remaining 4 - 10 cm shorter. Attach short boards with self-tapping screws to one of the long ones (perpendicularly). Lift the structure up and tie it to the supports. Then fix the second long board. Next up are the metal plates. To make the tower more stable, you can make stops. To do this, you need a board 5 by 10 cm. Attach the stops with an overlap using self-tapping screws. Install the boards on the floor frame, making gaps of 1 cm (with a matchbox), because the water must drain freely, and not linger in the house. Previously, cutouts for the trunk and branches must be made on the boards. Their diameter is recommended to be 5 cm larger, as the plant will continue to develop.

This is what the floor looks like
From the remnants of the material, make a staircase and railings. The openings between the floor and the railing are best sheathed with plywood or boards. The roof can be made from tarpaulin. To do this, at a height of 2 meters, screw 2 hooks to the right and left of the tower, between them you need to pull the cable. Throw a tarpaulin through the cable, around the perimeter and corners, pulling, fix the fabric. Make your own stairs. Children prefer rope ones, but consider the age of the "owners" of the house.

If the ladder is planned to be installed in the center, then it is necessary to make such a hatch
Now the tower can be painted, decorated, equipped with furniture and attractions, for example, a swing or a slide. Involve all family members in the work, and the boring process will turn into an exciting adventure.

Here is the finished house! Pay attention to how the tarpaulin roof is attached (perhaps the process was not completely clear to you in the text)
A tree house is a wonderful opportunity to return to childhood and make your little ones happy.
Figure 1. Building a children's tree house is quite simple, the main thing is to follow all safety standards.
How to build a tree house? All you need to build a treehouse for an adult is a country plot. The construction itself can be done with your own hands, showing design ingenuity. Subject to basic safety standards, a tree house can become a real fairy tale for children and a joy for adults who see happy children. Any fairy tale can come true! To do this, you need a little skill, ingenuity and courage in the implementation of the plan.
Construction features
Having decided to build houses on a tree, you need to complete the main tasks: find a tree with a trunk of sufficient strength on the site, solve the issue of the safety of the elevated position of the house, and ensure the necessary strength of the structure when exposed to the most adverse conditions. The strength of the house should be calculated taking into account the simultaneous presence of several people and the impact of weather factors: gusts of wind, precipitation, especially snow accumulation on the roof.
Design features

Figure 2. Scheme of fastening supports to a tree.
With any design decision, a do-it-yourself treehouse must have the following mandatory structural elements:
- supporting elements of the required strength;
- flooring that does not allow to fall down under any load;
- strong frame;
- a roof that can withstand any possible precipitation;
- ladder for climbing into the house;
- handrails or parapet, excluding a fall from a height.
In addition, the house should be provided with game elements appropriate for the age of the children.
An important parameter of the project is the height of the building. Naturally, it is, first of all, selected from the existing possibilities, i.e. the height of the tree on which the construction is planned. The house should be located on thick branches and a trunk, and not on top. In addition, the lifting height must be safe for children, and its choice is based on the age of the user. The optimal height is considered to be the floor level at a distance of 1.5 m from the ground for any age, but can reach 2 m for sufficiently adult adolescents. With a higher location of the building, the increasing influence of the wind at height should be taken into account. The area of the house is set taking into account the strength characteristics. Below are diagrams of some interesting tree house designs. (Fig.1. Tree house)
Reference tree selection

Figure 3. Scheme of building a tree house.
Most often, the house is located at the beginning of the branch of the crown from the trunk. The choice of tree for construction should be based on a firm belief in the strength of the supporting branches and trunk. It is necessary to choose a tree with a powerful root system, growing in dense soil. Best options: oak, fir, maple, ash. Unsuitable for their strength characteristics are: chestnut, birch, willow, poplar, linden.
Rotten and defective branches should not be chosen as horizontal supporting branches. All branches that are suspicious of strength should be cut off immediately so that they do not interfere with construction. The supporting elements must be at least 20 cm in diameter. It is desirable that the base be not one branch, but a sufficiently branched section of the crown. In other words, several independent support points for the house should be provided. When placing a building, the tree trunk should enhance the strength of the entire structure if the main support is carried out on horizontal branches.
The choice of material for construction
To ensure harmony with nature, the base of the house is made of wood. At the same time, the supporting part: supports, floor covering, frame, truss system, railings - must be made of a durable timber with a thickness of at least 70 mm with reliable fastening. The floor is made of solid board and covered with a sheet. Wall cladding and roofing are best done in a lightweight version so as not to increase the load on the supports. Here you can use lining, plywood or plastic. All wooden elements must be treated with anti-rotten compounds.
To align the load-bearing parts, it is advisable to use bolted connections; fastening with nails is not recommended.
Tree house supports

How a treehouse is supported depends on its size, weather conditions, height, and strength requirements. In practice, four main methods of fastening are used:
- Suspension system using ropes and cables.
- Reliance on piles with their fixation in the ground.
- Fastening to the trunk and large branches using props and brackets.
- A combined method that combines these principles.
Quite often, the structure is fastened directly to the tree. On fig. 2 shows the schemes for attaching such a system to the trunk and thick horizontal branches. Fastening is carried out using a wooden beam with a thickness of at least 50 mm. When fixing on the trunk, minimal damage to the tree should be done so as not to cause its death. (Fig. 2. Scheme of fastening supports to a tree)
The tree house can be located in relation to its trunk in two ways: on horizontal branches close to the side-mounted trunk and directly on the trunk when it passes through the room of the house through. A more reliable construction is provided in the second method, i.e. when the house is formed around a tree trunk.
The second common method of support: on piles fixed in the ground with a shallow foundation. In this case, from 1 to 4 vertical posts from a bar of at least 75x75 mm are used. Depending on the additional attachment to the tree, one central support, two side reinforcement posts or a system of 4 corner supports can be installed.
Required tool

To build a treehouse with your own hands, you will need the following tool:
- Bulgarian;
- electric drill;
- screwdriver;
- hacksaw;
- chisel;
- a hammer;
- wrench;
- plane;
- file;
- roulette;
- plumb;
- level.
Home construction
Building a treehouse with your own hands after erecting the supports includes the following steps: making the floor, installing the frame, creating a roof, installing stairs, and wall cladding. On fig. 3 shows a diagram of the main elements of the house. (Fig. 3. Scheme of building a tree house)
Floor of the house. The floor covering is assembled from logs measuring at least 50x50 mm in increments of 40-60 cm (depending on the area of \u200b\u200bthe house). Over the lags, sheathing is applied from boards with a thickness of at least 20 mm, plywood or chipboard of the same thickness.
If the house is mounted on the side of the trunk, then it is recommended to make a floor shield on the ground, and then raise it to the supports in finished form. When the house surrounds the trunk, the installation will have to be carried out at a height.
House frame. The frame of the simplest house includes 4 corner vertical posts, 2 posts for installing doors and posts for fixing windows. From above, the racks are connected by horizontal beams. All of them are made of a wooden beam with a thickness of at least 70 mm. If a sufficient area of the house with a balcony is provided, then additional vertical bars are installed at the place where the wall is formed, and the extreme posts are connected by strong horizontal railings at a height of at least 1 m.
Roof of the house. The roof of the house is made in the form of a truss system from a bar with a thickness of at least 50 mm. The roof, depending on the project, can be single or gable, as well as a flat type.
A crate of 20 mm thick boards is laid along the rafters, and roofing material is laid on top. The lower end of the roof slope is recommended to be lowered 15-20 cm below the ceiling. Roofing is usually made of waterproof plywood, but any material can be used, preferably lightweight. If the tree trunk passes through the house, then the gap between the roof and the wood must be sealed with sealant or foam.
If there is a child in the family, there should be a separate place for children to play. It is very easy to equip a safe and comfortable playground on a summer cottage or a suburban area. And an interesting and very desirable addition to the site can be a small house or hut, located right on the tree. Making a treehouse with your own hands is not so difficult if you choose a simple project and easy-to-use materials.


First you need to think through all the details and draw up a drawing. The main parameters are the height and area of \u200b\u200bthe house, as well as how it is attached. Usually the base of the house is a rectangular shield with holes for branches, supported at the corners by strong pillars. The walls and roof of the structure can have an arbitrary shape and be made from any materials at hand.

To get into the house, you need. It should be as reliable as possible, have a strong fastening and at the same time not spoil the appearance of the structure. It is impossible to nail the ladder to the trunk - this is detrimental to the tree, moreover, due to its growth, the structure will deform more and more. Rope ladder is the cheapest option, but it can be used at a low height and only if the child knows how to use it. All this must be taken into account when drawing up a project and calculating the material.


It is very important to choose the right tree, because the strength and reliability of the house, as well as the safety of the child, depend on it. You can not choose old trees with large hollows and voids inside, with large quantity dry branches, with open roots. Too young and immature trees are also not suitable for such purposes.


Preparatory work
Having chosen a tree, you need to properly prepare it. Small dense growth on the lower branches and trunk can be safely removed with secateurs, but medium-sized branches should be cut wisely. Illiterate pruning can have a detrimental effect on the tree, and it will dry out. To prevent this from happening, you can leave all the large branches and mount the base for the house around them.
For construction you will need tools:
- hacksaw or circular saw;
- a hammer;
- plane;
- drill;
- screwdriver;
- roulette;
- building level;
- sandpaper.
Materials will also be needed:
- edged board with a section of 5x25 and 2.5x15 cm;
- timber 150x150 cm;
- support beams with a diameter of 20 cm;
- galvanized screws;
- nails;
- metal mounting plates;
- antiseptic impregnation for wood;
- grease or oil working.
Before starting work, boards and timber must be processed and dried in the sun. This will prolong the operation of the house, protect the wooden surfaces from dampness and decay. The length of the support beams should be 1-1.5 m longer than the distance from the ground to the base of the house. Beams must be dug into the ground, therefore, after treatment with an antiseptic, the lower part of each beam is covered with a dense layer of grease, bituminous mastic or impregnated with oil mining.
Prices for different types of building boards
Building boards
House construction technology


House construction plan (top view)

Stage one - installation of supports
Carefully measure the distance between the main branches and determine the location of the platform for the house. The corners of the base are projected down and these points are marked with beacons. With the help of a drill, holes are prepared for the supporting beams; the depth of the holes is at least 1.2 m, the diameter is 25-30 cm. Sand is poured into the bottom with a layer of 10 cm, then the same layer of rubble. The beams are lowered into the pits, leveled and temporarily reinforced with a cinder block or struts from a bar.


All beams must have the same height and be strictly vertical. In this case, the tree trunk can be located between the supporting pillars or act as one of the bearing supports. The cement mortar is kneaded, poured between the walls of the pit and the post, left to dry. When the base is sufficiently hardened, the spacers are removed.
Stage two - platform installation

For the frame of the platform, take a bar, cut it to the desired length. If the platform rests on the pillars with all corners, surrounding the tree trunk, the supporting beams of the frame are fixed along the perimeter of the base. To do this, each beam is raised to the floor level, leveled horizontally and both ends are screwed to the inner surface of the pillars. The resulting strapping is reinforced at the corners with metal plates.

Further, additional bars are stuffed inside the frame, placing them parallel to each other at a distance of 20-30 cm. Where the tree trunk passes, a hole of the appropriate size is left. From below, the frame is lined with two transverse boards, placing them on both sides of the trunk. All connections inside the frame are reinforced with metal plates with bolts.


If one of the supports is a tree, the platform is mounted differently. The beam is raised to the level of the base of the house and screwed with both ends to the posts, and in the middle they are nailed to the tree trunk. Then, in the same way, the beam is fastened on the other side. Both beams must be located strictly horizontally. After that, other bars are stuffed from above, perpendicular to the lower ones, in increments of 0.5 m. Of course, all elements of the platform are bolted using steel plates.

The third mounting option is mounting without bearing supports. If the platform is mounted exclusively on a tree, 2 beams are nailed to the trunk 30 cm below the floor level on both sides. Then the rest of the bars are laid perpendicularly from above in increments of 50-70 cm and connected from the ends with thick boards. You should get a rectangular structure lying in a horizontal plane. Now additional spacers are installed: they take bars of the same section and fasten them at an angle to the platform, resting one end against the extreme bars of the frame, and connecting the lower ends on the tree trunk.
Stage three - laying the floor

For the floor, a high-quality edged polished board is taken. Carefully check the wood for the absence of roughness and knots, if necessary, carry out additional grinding. Cut the boards to the size of the floor and lay them out on the ground for marking. This is necessary in order to accurately cut holes for branches and a tree trunk, because at the top it will not work to make cuts neatly.

So, the boards are laid out in a rectangle, leaving gaps of 1-2 cm, measure the circumference of the trunk and mark the boundaries of the cutout on the future floor of the house. Using a jigsaw, cut holes of the desired diameter and try on a tree. The floor should not closely adjoin the bark, otherwise, with the growth of the tree, the structure of the house will be deformed. If the blanks correspond to the drawing, you can mount the floor on the platform.

The boards are laid on the frame in the same way as on the ground, with intervals of a couple of centimeters. These gaps are designed to drain rainwater. Fix the floor with screws or nails. The finished one should lie strictly in a horizontal plane, not creak, not stagger under loads.
Stage four - installation of the walls of the house


First, a solid frame made of timber must be installed around the perimeter of the platform. Here you can take lumber of a smaller section, for example, 50x50 mm. The beam is cut to the height of the walls and installed at each corner of the base, screwed to the protruding support beams with anchor bolts. Intermediate racks are mounted at a distance of 40-50 cm from the corner ones and fixed on the outside of the frame base. You can not fix the racks directly to the floor, such a connection will not be reliable.


Corner and intermediate racks are reinforced with spacers, and then sheathed with boards. The walls can be solid or lattice, it all depends on the preferences of the master. The number and shape of windows, as well as their location is also chosen at will. The main thing is that the openings are reliably protected and the child could not fall out of the house.


Stage five - installation of the roof


The roof is best done in the form of a canopy. At a height of 1.5-2 m above the walls, you need to find two strong branches located on both sides of the house. Metal hooks are screwed to the branches and a thick cord or reliable rope is pulled between them. A piece of tarpaulin is thrown over the rope and its ends are fixed at the corners of the house.

If branches interfere with the canopy, you can mount the roof in a different way. On the upper edge of the corner posts, a strapping of timber is attached. Next, 2 truss trusses are assembled and installed over opposite walls. Between themselves, the farms are connected by two wide boards, which are stuffed along the upper edge of the rafters. Additional fasteners for such a small roof are not required, and you need to close the structure with some kind of light material - polycarbonate sheets, or ondulin.


Holes for large branches are cut in the roof, as well as in the floor, if the structure cannot be installed otherwise. Again, it is impossible to fasten the roofing close to the tree; be sure to leave a small space around the cutout.
Stage six - installation of stairs
The stairs to the house can be rope, straight wooden, light lattice, long or short, gentle and steep. There are a lot of options, and choosing the right one is not at all difficult. One of these options is a ladder in the form of a shield with slots. To begin with, they take a beam of 50x50 mm with a length of 2.5 m and put it on the base of the house at an angle of 75-80 degrees, that is, almost vertically. Mark the cut lines with a pencil and saw off the excess. Cut the second beam in the same way.
Having laid the bars on a flat platform, boards with a thickness of 2 cm or more are stuffed on top. The width of the boards is 15 cm, the length is 50-70 cm. An oval hole is cut in each blank to the width of the foot and the cuts are processed with sandpaper. The cutout should be located on one side, at a distance of 5 cm from the end of the board. When sheathing the shield, the blanks are nailed so that the cutouts alternate: the first board with a cutout on the right, the second with a cutout on the left, and so on until the end.

The boards are attached to the beams with a continuous sheet, without gaps. The finished ladder is attached to the house, fixed on the outside of the platform with plates and bolts. Be sure to check the reliability of fastening, because a fall from the stairs can result in serious injury. A firmly fixed structure is treated with a primer with antiseptic properties, and then painted or varnished for wood.

The final stage - finishing
The house is ready, now it remains to decorate and make it cozy. To protect wood from weathering, all outdoor surfaces are recommended. It is advisable to choose the same tone for the walls and stairs, so the house will look more harmonious. It is not necessary to paint the boards inside, the main thing is that they be as smooth as possible. For convenience, you can fix light shelves inside, put a basket for toys or a children's table. The floor is covered with a soft rug, children's comfortable pillows are laid. Everything else depends only on the small owners of the house, so further arrangement should be entrusted to them.


Video - DIY treehouse